Splitting and merging the topics in WhizFolders document

Are there commands to split a topic and to merge 2 or more topics into one topic?

Merging is easy to do by copy and paste. There is no direct command to split but we have different ways to achieve it. More details follow.

Merging by Copy/Paste:

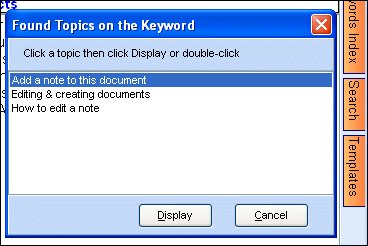
You need to select two or more topics in the list that you want to merge. Then copy them to the clipboard. Now create a new topic, start the editor on it and do a paste. This will paste the merged contents. There is an option to include the topic names of the selected topics too in the merged contents. You can see this option on the Edit menu,  “Include topic names too in above operation(s).”

Let me give you an example:

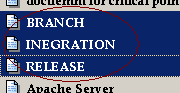
  1. I select 3 topics to merge in the list of Topics, named, “Branch,” “Integration,” and “Release,” I copy them to the clipboard by the Keys “Ctrl + C” or by using the copy button on the toolbar.
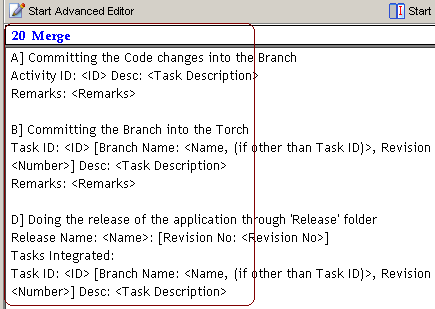
  2. I create a new topic “Merge,” open this topic in the advanced editor, and paste.The text from the 3 topics gets copied in a single topic as shown in the picture:

    merge.bmp

You can even do the paste in a word processor document to get the merged content.

Merging by Export:

Instead of copy/paste, you can also export the merged content to an RTF file or to an RTF file in the Word outline format. Just select the topics that you want to merge in the same way. Then use one of the operations on the menu ”
“Tools–Export” to create the desired RTF file.

Splitting a big topic or a word processor document in multiple topics:

This is described in another Blog article, Breaking up a large Word document into topics.

Importing and splitting an external big text file into multiple topics:

Suppose you have a large text file outside WhizFolders and you want to split it into multiple topics. You need to first understand how you are going to indicate to WhizFolders at what positions the text needs to be split. If the text file already has a repeating fixed word or phrase before each text block that you want to make into a topic then your job is easy. But first let’s take a case where no such repeating fixed word or phrase exists as in the following example.

  • To tell WhizFolders where the splitting should occur, I open the big text file in a text editor like Notepad/Wordpad and insert a fixed word “Split” in many places in the file as shown below.
  • Split
    BRANCH
    A] Committing the Code changes into the Branch
    Activity ID:  Desc:
    Remarks:  
    
    Split
    INEGRATION
    B] Committing the Branch into the Torch
    Task ID:  [Branch Name: , Revision No: ] Desc:
    Remarks:  
    
    Split
    RELEASE
    D] Doing the release of the application through 'Release' folder
    Release Name: : [Revision No: ]
    Tasks Integrated:
    Task ID:  [Branch Name: , Revision No: ] Desc:
  • Now I go to the WhizFolder document in which I want to insert the topics from this text file and click on the menu “Insert–Topics from a text file…”
  • A file selection dialog comes up where I select this text file that I prepared.
  • Now WhizFolders asks me for a topic prefix that means the fixed word or phrase that appears before each topic in the text file. In the above case, the prefix is “split” and I type it in and click on OK.
  • WhizFolders then imports the text file, splitting it at the fixed word shown to make many topics. Please see the following picture.
  • merge1.bmp

Note that the topic names were made up from the next line after the “Split” that I inserted. I could have given my own names to these topics by entering “Split: a topic name” instead. Then the topic prefix that I would specify to WhizFolders would be “Split: “.

Let’s take another example. Let’s say you want to export a number of email messages in your email software to a single text file and then want to import them in WhizFolders, each as a separate topic. If you select a number of email messages in your email software and save them together in a text file, you might get a fixed word automatically depending on the email software and its features. For example, each email message would begin with “FROM: “. In this case, you don’t need to edit the text file to insert your own topic prefix. You can simply tell WhizFolders to use the topic prefix “FROM: ” when importing that text file and it will make a topic out of each email message. But the topic names would be made from whatever text follows the FROM: on that line.

If you know any kind of programming, you can make quite interesting WhizFolder documents this way. For example, one WhizFolders user wrote a script to generate a text file containing a calendar event notebook for the whole year. In the script, he could generate a proper topic prefix and the name he wanted to give to these topics. The resulting event files are very useful and can be found at the bottom of the Calendar page on this web site. You can download a file from there and use it in WhizFolders.

The preset colors tend to be too dark for highlighting or coloring the text. I would like to highlight using a lighter custom color. Is that possible?

This article is old but is relevant. Only the screenshots are from the old version of WhizFolders. You can find these buttons by moving the mouse over them.

If you don’t find your favorite color in the “Text Color,” “Window Color” or “Highlight Color” drop-downs, here are the steps to define and use a custom color.

  1. Find the … button on the Editor next to a color drop down, circled in red in the following picture.
     
  2. Click on the … button. It opens a color selection dialog box. If the dialog does not show color shade selection on the right, click on the button “Define Custom Colors” at the bottom. The dialog extends to the right to show the color shades selection.
  3. In the above dialog, you can see different shades of colors on the right. Just click on the one, which you like. You can adjust the lighter or darker shade by moving the arrow (circled in Red) on the slider provided in the right-most part of the dialog. Now click on “Add to Custom Colors” button. The selected color shade will be added in the list of Custom Colors (circled in Blue) and is selected. Click on OK and this custom color will be used.
  4. The best part is that WhizFolders will remember this Custom Colors list. Next time, you do not need to go through the selection process for using this particular color. Just select it from the Custom Colors list by clicking on it.

Tip: WhizFolders adds another convenience feature. For any drop down, if you just want to use the color that you used last, you don’t need to even select it. Just click on the “Last use” button before that drop down. For example, the button is for using the “Last Highlight Color.”

I want to start WhizFolders positioned on a particular note from another program. How do I do that?

Universal links: If that program supports running external commands in its links, you can simply copy a Universal Link to a note and use that as the link target. This is described in Now you can insert a link pointing to a WhizFolders note in any application that supports hyperlinks.

Shortcuts: Sometimes, that other program may not support the above feature of having commands as links. Instead, it might support a limited external link that can only execute a shortcut. In this case, you will need to create a shortcut to the note and then use it. Here are steps to create shortcuts to WhizFolder documents or to individual notes within them.

Creating a shortcut to open a WhizFolder document: This is described in Always opening the same document when starting.

Creating a shortcut to open WhizFolders, positioned on a particular note: We will be giving this feature in the next version by a direct Tools menu. But for now, you can follow this procedure.

  1. You need to create a BAT utility only once:

    Using Notepad, create a file called “mystart.bat” with the following line in it:

       start %1

    Copy this file mystart.bat to a folder on your path, for example, to the Windows folder. You need to do this step only once and can use this utility later for all such shortcuts.
     

  2. Copy the universal link in WhizFolders for which you want to create a desktop shortcut.
  3. On the desktop, right-click New–Shortcut and enter the following in the Location box:

     mystart universal-link-copied-above

     
  4. Click on Next, and give a name to this shortcut.
  5. Click on Finish and the shortcut will be created on the desktop. Double-click it to test whether it opens WhizFolders at the note correctly.
  6. Now you can use this shortcut as a link target in that other program. You can even rename this shortcut to a shorter name or copy it (using Windows Explorer) to another folder if that makes it easier to remember its name.

Using templates (canned text or boilerplate text)

Many times you may want to reuse the text for another topic with some minor changes. Earlier, in the Pro version, you did this by copying topics via clipboard or drag and drop. But we have made this easier and more powerful with the use of “text templates.” You can set up a WhizFolder document to contain templates and then reference this document to insert boilerplate text in other documents.

The topics from this template document appear in a collapsible list on the right of the document as shown in the following picture.

List of template topics

Select any topic from the above list, and click on a button “Use.” This makes up the canned text from that topic and inserts it at the current editor position or as a new topic (if you are not editing).

Advanced users will be delighted to know that you can insert some tags in this canned text. These tags can be date, time or entry fields. If entry fields are present then as soon as you click, a form comes up where you enter the field values and the text is created from them. See examples below.
List of template topics

List of template topics

Assign Keywords to topics and selected text

Sometimes, a topic may not actually contain the word that you want to associate with it. For example, a topic may be related to “marketing” but doesn’t have the actual word “marketing” in it. You can assign a custom keyword “marketing” to all such topics.

List of keywords in the document

All such keywords appear in a collapsible frame on the right of the document from where you can select any keyword and go to the topics or topic text assigned to that keyword. For example, the picture above shows the keywords from the WhizFolders tutorial document. If we click on the “Editing a document” keyword, it will show all the keywords assigned to it and we can then go to any of those topics as shown in the following picture.

topics assigned to a keyword

Keywords can point to the text within topics too. For example, you can select the text “selling idea” occurring in a topic and assign a keyword “marketing” to it. Then it will be attached to the keyword “marketing” in the keywords list.

Note that although we call these “keywords,” you can call them anything. They can also serve as bookmarks to various topics and positions in the document.

New feature to see assigned keywords directly: In the new version, you can directly see keywords assigned to a topic in the right pane. In the earlier version, this could be done only by going into the manage keywords screen. Please read more about this feature in this Blog article.

“WhizFolders as a Learning Tool” by Peter Dodge

People wanting to learn a new subject or extend their knowledge often find that it helps to restructure information from books, articles, Internet, etc. into an organization that makes sense to them.

This process has three main benefits:

  1. Promotes extra attention on the information.
  2. Relates new information to the existing understanding.
  3. Develops the skill of creating summaries.

All of these are known to help people remember more information than simply reading.

WhizFolders directly supports this enhanced learning by:

  1. The transformation from an information source into WhizFolders forces you to focus more attention on the material to be studied. The mental process is one of trying to summarize or pick out the main points from the information source in order to translate it into Topics. As the reading and study continues, the Topic structure is often revised to conform to the latest understanding. WhizFolders is ideal to support this 2-way process of information summarizing and structuring. All this extra focus on the new information, although taxing at the time, is actually helping you remember it!

  2. Developing the WhizFolders Topic List (and Jump hyperlinks) maps the new material into a structure which conforms to your existing way of thinking. Since you create the WhizFolders structure, it is your attempt at understanding the subject. As more material and Topics are created, new ways of structuring the Topic List (and linking it using the Jumps) occurs. Once again, as you struggle to organize and reorganize the material, it is actually increasing your understanding of the subject area.

  3. Since it is tedious to simply copy complete sections from books and printed materials into large word processor documents, or just blindly save the web pages into different files; the WhizFolders Topics concept encourages you to summarize the key information into a short note form. The challenge of deciding if the key information should be a Topic in the List or a note in a Topic is also good discipline and a useful part of developing the skill of summarizing information. The notes you write should be as short, clear and information rich as possible. This is a skill which can be reused time and again in many other written forms, e.g. report writing, important e-mail, giving written instructions, meeting notes and summaries, etc.

Some may recognize this process as similar to an exam revision. To a large extent this is true. Although this may not evoke pleasant memories for some, it was probably a time when you felt that you learned a great deal.

Use WhizFolders as a Learning Tool for any subject that requires reference to more than one information source (or even a single source, if required). Create Topics for each important aspect using outlining techniques and your current understanding of the subject. Also create Topics for each of your information sources, using links to the web, files on disk, or short summary notes of the books and articles you read.

Encourage yourself to create many types of Topics if you are unsure how to structure the information (e.g. Subject Areas, Key Themes, References, Test Structures), but do not invest vast amounts of time linking them all with Jumps until you have a structure you feel comfortable with (but do put in the ‘obvious’ Jumps – i.e. the Jumps that you think are important, these usually stay in anyway).

Experiment with the Topic List structure whilst trying to focus on organizing the subject in your mind. What are the main subject areas, in your opinion? If the book/article/information you are looking at uses a different organization, reorganize it into your way by taking notes from the source and writing them as Topics into your structure.

If you create many Topics as short notes from books and articles, make sure you keep some text with the Topic of where it came from (e.g. a Jump to the reference Topic). If you rely only on the Topic List structure to show where it came from and then re-order the Topics, the source may easily be lost.

Encourage yourself to summarize the key points from your different sources, even though this is quite a demanding task. It will force you to really focus on the important points and ignore less relevant material. Write the reference page number or exact point where the information came from in your note text so that you can go back to it later during your reviews. If you read away from the computer, take some manual summary notes with paper and pencil and rewrite them into WhizFolders later (this 2-step process is excellent for concentrating on the content first – paper – and the structure second – into WhizFolders).

The WhizFolders development of your subject can be as short as 1 day or may take many years. Using WhizFolders allows you to naturally organize information in the way that makes sense to you. Sometimes we feel the need to be given a structure for a subject (because we may be new to it, for example), rather than create it ourselves, but generally if you look at some of the subject overview information sources, the contents pages will suggest some likely key areas. WhizFolders makes it easy to reorganize anyway.

To conclude, these are just some initial thoughts to using WhizFolders as a Learning Tool, albeit based on using WhizFolders for several years. This may be a subject that can be developed over time as more people think about how they use WhizFolders to aid their learning and structuring of information and then contribute to this weblog.

— Peter Dodge

Peter works in IT and Telecoms and has interests in psychology and in music (piano playing).

Moving your existing files

Before we discuss this, do you know that your WhizFolder files are separate files like any other application files on your disk? If you understand this concept, please read this article. Otherwise, first read the concept in What are WhizFolder files.

When you create a new file, WhizFolders always asks you for a file name. It selects the location Documents by default but there is no reason why you can’t change it. If you have not been paying attention, perhaps, all your files are ending up in Documents.

You might want to move over all your files to a new location, for example, a Dropbox folder. Here are some tips on moving them.

Tips for moving your files:

Simple case: I am assuming a simple case where you have determined that all your files are in Documents and you want to move them.

  1. Make sure that WhizFolders is not running or does not have any files open.
  2. Open Documents in Windows File Manager
  3. Make sure that you are seeing the files list in details mode (View–Details menu)
  4. Click on the column heading “Type” so that all WhizFolder files appear together in the list.
  5. Select them all using standard Windows keys.
  6. Right-click and Copy to clipboard. (don’t use Cut unless you are an advanced user already)
  7. Go to the desired target folder in File Manager where you want to put the files.
  8. Right-click in the folder contents (right-pane) and do a paste.
  9. A Windows Copy operation starts. If there are any errors (for example, if the file is open in WhizFolders or there is not enough disk space), correct the situation and try a paste again.
  10. Once you are sure that all the files are copied properly, you can now update the List of Files in WhizFolders. Here are the steps.
    1. Start WhizFolders and click on the List of Files tab.
    2. Select all the file names that are pointing to the old location.
    3. Right-click and do “Remove from List.” This merely removes the old location file name entries from the list.
    4. Right-click and do “Add an existing file.” A file open dialog comes up. Go to your new folder where you copied all your files above. Select all those file names in the file open dialog and then click open.
    5. Your list is now updated to point to the new location for all those files. Open a few files from the list to see that the new documents are opening correctly.
  11. Once you have updated and verified the List of Files as described above, you can now take a safe backup copy of your old files in the old location and then delete them.

Not so simple case:? What if your files are scattered over several file system folders and you want to move them all to one place?

For this, Windows Search Files operation can be useful. Chances are, if you have created files in many locations, you are already an advanced user of File Manager and you can do the moves yourself.

Inserting OLE objects

OLE (activex) is a great technology whereby a WhizFolders topic can show the contents of another type of document and can let you edit it from within WhizFolders. For example, you can put an Excel spreadsheet or a Word document in a topic. In order for this to work, the host application for that type of document must have an OLE server on the system. When you go to insert OLE objects, you would see a list of all kinds of objects you can insert.

Before I continue, some important points: You can either have objects that completely reside in your WhizFolder document or you can just have a link to an external file holding the object. Unless you know that the object is small, I would recommend you to always use a “linked” object. Otherwise, you might slow down WhizFolders considerably. I will explain how you create a linked object in the following discussion.

We will follow an example step by step.

  1. Suppose, you have an excel spreadsheet called “my account.xls” that you want to insert as an OLE object in a topic called “My account.”

  2. First decide whether you want to insert a complete copy of the spreadsheet or just a “linked” object. I always advise a “linked” object unless the object is very small. The advantage is that your xls file stays outside for you to manage or edit separately. At the same time, WhizFolders can always display the latest contents of this file.

  3. There are two ways, you can insert. Just drag and drop this file from Explorer to the Topic editor with Ctrl key pressed. Then the same dialog will appear that appears when you click on the menu “Insert Object” on the editor. So for existing files, it is quicker to use the drag and drop with Ctrl key method and for new objects, it is better to use Insert Object.

  4. On the dialog, select the file you want to insert (unless already filled in the drag and drop method) and select “Create from File.” Check the Link to create a linked object and click OK.

  5. That’s it. You will see that the topic now shows the spreadsheet! To edit the spreadsheet at any time, you just need to double-click on it or select “Microsoft excel spreadsheet Object–Edit” on the right-click menu. This menu changes description based on the object. Very neat!

  6. There is yet another magic up WhizFolders sleeve. If you are using a non-linked object, you can take advantage of in place editing. You can put ON an editor option “Use in place editing of OLE objects” in General Options. If you do that, for editing, the topic editor itself assumes the role of Excel application and starts looking like it with proper toolbars etc. But this feature is not available for Linked objects.

So understand OLE for once and start using it to your advantage. Only remember that you should not put large OLE objects as embedded objects and you will be ok.

How do I copy many notes to my Word document?

This article is old. You can find the latest information in the User Guide that you can download from whizfolders.com downloads section.

There are many ways to copy notes in WhizFolders. Before we describe them, there are two basic operations you need to know.

  1. Selecting many notes in the list: You can use the Ctrl-click to select multiple notes. This is similar to Windows Explorer.
  2. Deciding whether you need the note names in the copy: Many operations that we describe below copy or omit note names depending on the option “Include Names” that you put ON on the Edit menu. So decide whether you want the names along with text and put this option ON or OFF.

To copy the notes, you first select multiple notes and put on the Include Names option as described above. Then do one of the following:

  • Copy then Paste: Click on the Copy toolbar button and then paste in your word processor document.
  • Drag and drop: Bring both the list of notes and the word processor windows in view. Start dragging from the icon part of the selected notes to a suitable position in the word processor document.
  • Export to an RTF file: Click on the menu “Tools–Export Selected Topics–To single RTF file.” Then you can open that RTF file in your word processor.
  • Export to multiple RTF files: Click on the menu “Tools–Export Selected Topics–To multiple RTF files.” It asks you for a folder to create one file for each note.
  • Export ALL the topics to an RTF file: This operation is useful to make a complete RTF back up of all your notes from time to time. It is available on the File menu as “Save RTF text of all the topics for backup purposes.” It always exports all the topics and always includes the note names.

Then, there are many other possibilities that you will see on the Edit and Right-click menu on the topic list. For example, you can only copy plain text of notes or the note names only.

Tip: On the Edit menu, you will see an operation “Copy selected topics as they would appear in viewer.” You will understand this only if you know how hyperlinks are coded as Jump statements in WhizFolders. This operation beautifies the links so that the Jump statements are hidden in the copy if possible.