Is there a single place where I can change the font for the notes?
If WhizFolders were a plain text notes application, you could get away with just one font setting. But since it’s a rich text application, you end up using fonts and font settings in many places:
You may use multiple fonts within the rich text content of topics in the note editor.
You may use a particular font for the list of topics (this is a per file setting)
You want any new topics to start with a particular font (this is a per file setting)
Multiple fonts within the rich text content of topics
This is easy and obvious. In the editor, you select some text and change its font by the Font pull down on the toolbar. Once a topic has been created, this is the only way to change the fonts within its text. You may ask,”But what font does a new topic start with?” This is described next as “Default font for new topics.”
Font pull down in the editor
Next two font settings–List font and Default font for new topics can be set up for the current WhizFolder file
1. Font for the list of topics in the current file
There are two ways to bring up the settings for the file as shown–from a button below the list or from the toolbar.
Settings for the WhizFolder fileAccessing Settings for File from Toolbar
Change the font for the list on the screen that comes up.
Changing font for the topics list
2. Default font for any new topics that you create in the current file
Switch to the page “New Text” int he above settings screen. Then select the desired font.
Setting default font for new topics
But do I have to change these settings for each new file I create?
No, WhizFolders remembers these settings and applies them to any new file that you create by using the New menu of WhizFolders. You need to change the settings only when you want to change them for an existing file.
Caveat: If you create a new file from Windows File Manager or Explorer, it gets the standard setting of Segoe UI 11 font
So if your favorite font is different, please always create a new file from WhizFolders program and not from the File Manager.
Can I change the font for many notes that I already created?
Yes, you can by using the following steps. But it will change all the text to the given font and font size. The text attributes like Bold, Italic, etc will remain untouched.
To change font for many topics at once:
1. Select the desired topics in the Topics list by the standard Windows multi-select feature–Ctrl-click. Or, if you want to change all of them, use Edit–Select All.
2. Right-click on the topic list and select the menu Change Font.
Change font of existing topics
3. Important: A warning appears as shown below. For example, if in a topic, you have some text set to “Arial, 15” and another text set to “Times New Roman, 10” then this operation is going to change all the text to the new font and font size that you specify. Since this is a big change of formatting that can not be undone, this warning appears each time and you can cancel out if you don’t want to proceed.
.
Warning on change font
As already explained above, although the font is changed everywhere to the new one by name and size, the attributes like Bold are untouched which is what you want anyway.
How do I clear all formatting of selected text?
A new button “Clear formatting” is coming in the new version 7.1.5 that will be released soon. It clears the formatting and resets the font to the default that you have set up for the New Text above. It’s a smart operation that does not delete the pictures in the selected text. So even if you select all the text of a topic and clear, it will retain your pictures or other OLE objects.
On a related note, how do I paste rich text copied from other applications as “plain text?”
Use the right-click menu operation “Paste plain text.” This will paste the text in whatever font is set up at the current position in the editor. The shortcut keys for paste plain text are Ctrl-Shift-V. If you do this often and rather want Ctrl-V to do a plain text, you can switch those shortcut keys by a setting on the Settings–General–Clipboard.
Talking of plain text, why is it that I always get Plain Text pasted when I copy some information from the Internet browser. Why doesn’t it paste rich text?
You need to use a browser that puts the RTF format rich text on the clipboard. The only browser that does that is Internet Explorer. So if you copy paste information from Internet Explorer, you will get rich text pasted. But if you use Chrome or Firefox, you will get plain text because those browsers do not support RTF format and WhizFolders rich text is all RTF.
For example, if you enter the above line and hit enter at its end, you get a table with the column boundaries defined by plus signs. Earlier, you had to use the table tool for doing that.
Add more rows: Just hit Enter after putting the caret at the end of one row and you get another row. Or, you can also hit Tab key when in the last column. Otherwise a tab advances you to next column and a shift-tab goes back one column.
Resize columns directly in the editor: You can resize columns by using the mouse directly in the editor. Earlier, you had to use the table tool for that.
Table tool in WhizFolders might still be useful in some cases: Table tool need not be used now for the above features in Windows 10. It was mainly implemented for inserting and resizing the tables by using a third party tool. But it may still be useful in cases where you want to insert or delete columns. If you discover a trick in Windows 10 that lets you do that too, please let me know.
Outlining in the topic list is the “recommended” approach in WhizFolders because it gives you the power to rearrange your outline by the easy “Move” buttons or by simple drag & drop of multiple topics, including their children.
Is it possible to automatically number the topic titles?
The topic titles serve as headings for an outline. Consider the following test outline prepared in the topic list.
A sample outline for testing in WhizFolders
To auto-number the outline, I click on the “List Settings” button marked in the above picture. I get this screen.
How to number an outline automatically
I switch on the marked option “Show Numbered List” above. Here is the result.
An auto-numbered outline
Once you switch on the Numbered List option, the list stays numbered, no matter what you do. If you add more topics or move the topics up or down, all the topics are renumbered automatically.
Is it possible to print the outline from the topic list while preserving the indentation?
Yes, here is a screenshot of the Microsoft XPS printout of the list.
A printed outline in WhizFolders
If you don’t get the same results, check the printing options for multiple topics. You can see them by clicking on Settings–General Options.
Changing General Settings in WhizFolders
You need to look at the page “Printing multiple topics” and switch on the option “Print indented” shown below. Make sure that the other marked option “Do not print topic titles” is off.
Outline printing options in WhizFolders
The space before and after the headings is controlled by the “Spacing in lines” settings at the bottom of the above screen. Currently, the minimum values allowed are 1 line before and after. But on an afterthought, I’m going to allow “zero” as the value for a more compact printing in the next version.
How do I print a compact outline without the headings?
This is the best part of WhizFolders when used in outlining. It’s so flexible! You can break up a large block of writing, even a complete novel into pieces that you outline, develop and write separately. Now you want to combine those pieces into a complete text draft. You don’t want the headings or topic titles in that case. All the export and printing features of WhizFolders give the option of switching off headings. So you can select all the parts and then perform operations “copy to clipboard” or “export to RTF” with the option not to include topic titles. Once you do that, you get a complete merged block of text without headings.
A similar option is available in printing too. In the options described above, you switch on the option “Do not print topic titles.” Here is the result.
Can I switch off the numbering of headings in the printed outline?
Yes, that is controlled by another option on the “Printing” page of the general options screen. The option that you want to switch on is marked in the following picture, “Do not number topic names in the printout.” Note that printing of numbers in the headings is controlled entirely by this option and not by the auto numbering option that was described above for “viewing” the topic list as numbered.
How to switch off numbering of outline when printing
Logically, this option should have been with the same set of options described earlier but I never had a chance to redesign printing options and I can see that they are over crowded. I have plans to redesign the whole options area using a nice ribbon bar menu.
Do you see now why you should be using the topic list for all outlining?
You can break up your whole writing project into pieces, develop the outline and later merge it while printing or exporting the way you want.
Current limitations of the topic list are, “No control on the numbering format and style of the individual headings.”
Currently, you can not control the number format for the auto numbering or for printing. This is not too difficult to implement, and I’m going to do that in the next version itself. Another thing, it’s not possible to change the style of individual headings or topic titles. That’s more difficult to handle but will definitely be there in the next “major” release of WhizFolders.
But you should know that you can control the font of all the titles by the same “List Settings” screen that we saw earlier. Also, the printing options allow you to select the bold or italic type formats of all the headings. See the screenshot of the options for “printing multiple topics” above.
Workaround solutions for the above limitations
1. Export to Word Outline format: If you export the outline to Word outline format by the Tools–Export to RTF menu, you can then open it in Microsoft Word and change the styles as well as numbering by its advanced formatting features for headings. I had implemented this solution on the request of a customer who was happy with the results. But I, myself, have not used or researched it extensively. If you want to go this route, please share your experience with me.
2. Put headings in the topic text itself: If you put the headings to be printed or exported within the topic text itself at the top, you can still control them fully. But then you will have to switch off the export or printing of actual topic titles by using the options described above in “How do I print a compact outline without the headings?”
You can even avoid putting the headings in certain topics if they don’t need it in a merged output. You get complete flexibility. The only problem is, if you move the topics around, you may need to renumber the headings that you put in the topic text. They won’t renumber automatically because they are not in the topic list. But this is a solution that is workable indeed as long as you don’t resequence the outline often or do not need numbering at all for the headings but just headings with different styles.
Exit topic list and Enter topic editor for outlining
How else can we work around the above limitations of the topic list? For smaller outlines, you can use the nested numbered lists in the topic editor.
Then you can use custom numbering as well as style because it is within the topic editor. You will lose the power to move the headings around though which is available in the topic list. Perhaps, drag and drop will work in the editor too but it will be difficult to select whole items before dragging.
Making nested numbered lists for outlining in the topic Editor
For this to work properly in WhizFolders, the editing caret (blinking cursor) must already be on a list item. See the following picture where I started a “numbered” list in the editor and the caret is on the second item.
Starting a numbered list
By the way, I’m using the Advanced Editor that gives me a wider window for editing. You can do this in the quick editor too.
Whenever you click on the increase indent button, it starts a nested list
In the following picture, the increase indent button is shown marked. When I click that, I get a nested numbered list in a different format than the enclosing list.
Start a nested list with different number format
The inner list is in roman numbers. But I can change the number format by the “List Type” pull down on the Tool bar.
Changing number format of the nested list
I change the nested list format to A., B., … Then I click on the same increase indent button and add another nested list, changing its type to 1., 2. by using the same technique as described above. Here is how it looks now.
Resuming an enclosing list in nested lists
Now, how do I resume adding items to the “enclosing list?”
When the editing caret is as shown above, I click on the decrease indent button circled above. This will resume the enclosing list. Please see the picture below.
Enclosing list resumed at correct next item, C
Did you notice that it resumed at the correct next item, C. If I were to click the same Decrease Indent button again, it will resume the main list.
Resuming the correct number in the enclosing list can sometimes break
You will see that as you increase and decrease indent, making nested lists, or even insert blank lines in between, WhizFolders is able to continue the numbering.
For example, see the following picture. I hit the Enter key several times to insert some blank lines. This stops the list numbering. But if I click on the Numbered List button, it resumes the list again at C. This “correct” resuming has lot of effort behind it.
Inserting several blank lines and clicking on the Numbered List button resumes the numbering at the correct sequence.
What if the numbering breaks? There is a solution.
Resuming the numbering might break at times due to some internal rtf formatting. If that happens, you can take help of a special button. See the button marked in the above picture, next to List Type pull down. That is a “Change starting number” button. If I click that button, I can change the next sequence number.
Change next sequence number
I can enter the number 3 if the sequence was other than C and I wanted to correct it to C. The only trick is that you need to enter a number that you want the numeric list item to use. If the numeric list is of the type A., B., C., you still need to enter a number, 1 for A, 2 for B and so on.
You can use “Change Starting Number” button to start a new numbered list in the same topic.
If later in the same topic, I want to start a new numbered list starting from 1, I will have to use the same button and start at 1. In fact, that’s the main purpose of the button as originally designed. But it can be used for fixing a number too.
If you get any more questions or ideas on the same topic, please write to me and I will try to answer them in a new post.
This article is old but is relevant. Only the screenshots are from the old version of WhizFolders. You can find these buttons by moving the mouse over them.
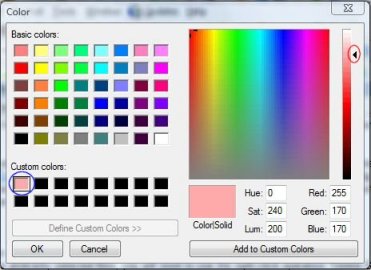
If you don’t find your favorite color in the “Text Color,” “Window Color” or “Highlight Color” drop-downs, here are the steps to define and use a custom color.
Find the … button on the Editor next to a color drop down, circled in red in the following picture.
Â
Click on the … button. It opens a color selection dialog box. If the dialog does not show color shade selection on the right, click on the button “Define Custom Colors” at the bottom. The dialog extends to the right to show the color shades selection.
In the above dialog, you can see different shades of colors on the right. Just click on the one, which you like. You can adjust the lighter or darker shade by moving the arrow (circled in Red) on the slider provided in the right-most part of the dialog. Now click on “Add to Custom Colors” button. The selected color shade will be added in the list of Custom Colors (circled in Blue) and is selected. Click on OK and this custom color will be used.
The best part is that WhizFolders will remember this Custom Colors list. Next time, you do not need to go through the selection process for using this particular color. Just select it from the Custom Colors list by clicking on it.
Tip: WhizFolders adds another convenience feature. For any drop down, if you just want to use the color that you used last, you don’t need to even select it. Just click on the “Last use” button before that drop down. For example, the button is for using the “Last Highlight Color.”
WhizFolders 6 or later displays tables very well as it supports the use of new Microsoft RichEdit 4.1. Unfortunately, there is no inherent table designing or modifying features in Microsoft RichEdit control. It only allows you to edit the text and other contents of the tables, not the tables themselves. For example, you can’t insert or delete columns and rows.
Design tables in Word: If you have Microsoft Word then you can design the tables in Word and then copy and paste them in WhizFolders. After that, you can edit the table text within WhizFolders itself and it works very well. But if you have to modify the table design, you need to copy the full table and paste it in Microsoft Word, make your change and bring it back.
Use the Table Tool: If you don’t have Microsoft Word then you might consider using the new Table Tool in WhizFolders. Let me tell you frankly that this table wizard uses a different editor control. This editor control has its own limitations, quirks and bugs. However, it does have all the basic features of designing and editing tables. Some tables may not look exactly same when the wizard puts them back in WhizFolders RichEdit. Most of the time it works well. You need to experiment and see what feature works and what doesn’t. Here is a picture of it in action:
No, this editor control is not from Microsoft and is not an RTF based editor. We had to go through considerable effort to interface its use with WhizFolders editor. To summarize, we don’t guarantee that the table editor will work perfectly all the time with Microsoft RichEdit, an RTF control that we use in WhizFolders. But it works for most primary purposes when designing a table. The modify table doesn’t work that well yet. But the nice thing is that you can cancel out of the changes if you don’t like them in the Wizard. Or, if the table doesn’t modify well after you hit OK, you can do an Undo in the WhizFolders editor to go back to the earlier state as long as you have not saved the document.
That’s why I recommend using the Advanced Editor when working with tables. You can use the quick editor but remember that it commits the changes if you move to another topic. So if you plan on doing an Undo, keep editing the same topic or better still, use the advanced editor. This is true for most of the editing, not only table editing. The quick edit should be used only for that purpose, for “quick” editing. Use the advanced editor whenever possible.
Still, if you have Microsoft Word, I recommend that you use it for designing a table and then put it in a WhizFolders topic and it will display very well. You can even edit text in it quite well. Perhaps, in a future version, we will use Microsoft Word itself as our table tool if it is present on your system.
A tool like that is already there on the Editor but works in a different way. It is called Pick and Apply format. You will find two different buttons on the editor toolbar, one to pick a format and other to apply it. This way, you can pick a format from some selected text and go on applying this format to another selected text. The picked format is remembered for the session till you pick another format.
There is also a feature to include the paragraph properties in the picked format. But you have to put on that option. It is off by default. You will find it in the General Options–Editor.
Always use Insert Picture or paste the picture so that WhizFolders detects large pictures and gives you a chance to reduce their size to avoid bloating and slow browsing of the files.
If you use Insert Object to insert pictures, the above problems may occur causing very large files that are slow to open and browse.
Question:The default paragraph spacing is 0.0 before and after. It would be nice to be able to set your own default paragraph attributes, rather than having to open the full editor and change the attributes of a paragraph through the format menu each time you create topics.
You can set this up by following this procedure:
Make sure that the option “Pick and Apply Format Buttons also copy Paragraph settings” is ON on the Editor page of General Options.
Now, use the Pick Format button in the editor to pick up the format from the desired paragraph.
Click on Settings–List File and go to the New Text page.
Click on the Copy Last Picked Format button.
This will set the desired settings for the new topics so that you won’t have to change them each time.
Just look at the Settings–List File. You will see a New Text page where you can set up the font to use for any new topics that you create. But, the default font for the existing topics can’t be changed as they already contain the rich text encoding. For this, you need to select those topics and do the right-click action Change–Change font.
You can also change the font for List of topics on Settings–List–List Settings page.


 button is for using the “Last Highlight Color.”