Get a 2022 Calendar Diary for use with WhizFolders

If you are already using an older Calendar Diary file with WhizFolders, you can straightaway download the new year 2022 Calendar Diary file from the link given at the end.

The hyperlinking features of WhizFolders can be put to good use in a Calendar Diary (or events) file where in addition to quickly going to a date’s page, you can go forward, backward by days, weeks, months. You can download such a Calendar Diary file for the current year by a download link at the end of this article.

Many uses of this file: You can use this WhizFolder file as a calendar diary, journal, events, tasks or for any free format note taking related to dates. Further, you can use it with any WhizFolders edition (even the trial). You can feel the power of WhizFolders hyperlinks and free format concept when you start using it. Please look at the tips in the “How to use” topic at the top of the file.

Here is an example of how a Calendar Diary file works:

Download: You can download the latest year file from the Downloads page of WhizFolders.com

Important note on downloading: Sometimes, the browser downloads and marks the file read only in the file system. In that case, WhizFolders opens it read-only and you can not modify the file. If you see a read-only label in WhizFolders after opening this file, please use Windows Explorer to see the right-click properties of this file and switch off the “read only” flag. Then open the file in WhizFolders again.

The idea for events file originally came from Steve Jarjoura who contributed the event files for earlier years. I am now generating the event file from a small utility that I made up. I have used some new features like icons and Popup links in the new file.

Using WhizFolders to deal with complexity of managing Adwords campaigns

The initial research for any new adwords campaign can be quite complex. When it comes to Adword Tools, Google has Keyword Planner and Adwords Editor. They are OK but have no features for keeping notes on various activities. Adwords Editor does have a Comment panel now but that does not really help. I use WhizFolders to manage the complexity of keeping notes on Adwords. Please Read the article here.

What are WhizFolder files

This is not an introductory article on WhizFolders. You should read it only after you have used WhizFolders for a while. The purpose is to remove some misconceptions about how notes are stored in WhizFolders. Even if you are an experienced user of WhizFolders, you will find some useful information below.

A WhizFolder file is like a notebook: You can keep notes belonging to a subject or category in a particular WhizFolder file. You identify WhizFolder files by their file names in Windows File Manager.

You decide what name a WhizFolder file gets and what location it is created in: The New File action in WhizFolders lets you select a file name and folder location for the new WhizFolder file. By default, it selects the Documents location but you can change it to any other disk.

Identify by File Type in Windows File Manager: WhizFolder files have the File Type “WhizFolder File” and show up with a special icon in the File Manager lists. The actual extension is .wzfolder.

WhizFolder files are not deleted when you uninstall WhizFolders:

  • When you uninstall a program like Microsoft Word, does it delete all your Word documents? No, the documents are your own files and they should be preserved.
  • Similarly, WhizFolder files are not deleted when you uninstall WhizFolders.
  • You can always view notes in your WhizFolder files by using the freeware WhizFolder Viewer that you can get from the download section of WhizFolders.com web site.

Manage by using Windows File Manager: You can manage WhizFolder files like any other files by using Windows File Manager. Copy or move these files to other disk locations with regular File Manager operations like Copy, Cut, Paste, etc.

The List of Files is not the only way to Open WhizFolder files:

  • You can open WhizFolder files directly from Windows File Manager by double-clicking or opening them by right-click menu.
  • You can have shortcut icons on the desktop that open a WhizFolder file.
  • You can create such desktop shortcuts either by the standard right-click drag actions in Windows File Manager. Or, you can use the Tools menu in WhizFolders to create such a shortcut for the current file.

The List of Files in WhizFolders is just for convenience:

  • It automatically keeps the list of WhizFolder files in “last used” order so that you can reopen them directly from there instead of going to Windows File Manager each time.
  • The List of Files is not a database that keeps all your notes. It’s just a list showing you the file names and locations of WhizFolder files that you have been using.
  • List of Files is equivalent to the “Recent documents” list shown in other applications like Wordpad.
  • There are some special menu actions available on List of Files tab, for example, search through many WhizFolder files.

Sometimes you may need to update the List of Files manually:

  • If you move or rename a WhizFolder file in Windows File Manager then the old file name will stay in the List of Files.
  • For moved or renamed files, you need to delete this old file name entry from the List of Files by a right-click action.
  • Also, the new named or moved WhizFolder file will not appear in the List of Files tab until you open that file from the new location by using the File menu or directly from Windows File Manager.

You should maintain a backup copy of your WhizFolder files:

  • Hardware failures or network problems can cause corruption of WhizFolder files like any other files on your disk.
  • Hence, you should copy your important WhizFolder files regularly to another location for safe keeping.
  • You can use Windows File Manager to do simply copy files or you can use other backup software.
  • The backup feature given in WhizFolders is a straight copy operation with some file naming features for your convenience.

You can keep WhizFolder files on “cloud” drives to use from multiple computers:

  • You can keep WhizFolder files on “cloud” drives like Dropbox so that you can always access the latest copy from another computer.
  • You have to take certain precautions when doing it. Always close such WhizFolder files after use otherwise the cloud syncing will have errors and you won’t be able to access the latest copy of such a file from other computers. You can identify such problems by looking for “conflicted copy” in the file name when using Dropbox.
  • Windows shut down can also cause such problems for any type of file. You should close all applications like WhizFolders separately and give their files a chance to be synced before you shut down Windows.
  • See some background and details in the article Using Dropbox.

Backup features in WhizFolders

Before you read this article: You should know that WhizFolders saves a copy of a note whenever you save changes or delete that note. You can see these copies in the Changed Notes program that is accessible from the menu Edit–Recover Information from Changed Notes Archive. This database is deleted when it’s over 100 MB in size but you can change that setting to let it grow till you delete it. So whenever you lose any note accidentally due to changes or deletion, you can look for old copies in the above database.

Backup features in WhizFolders

On any computer system, a data loss or corruption can occur due to any reason–hardware or software problems, viruses, etc. You must make a backup copy of all your files belonging to all applications like WhizFolders.

A simple copy is enough: You can use standard backup software or you can do simple copy by using Windows File Manager. Just copy all your WhizFolder files from time to time to a safe location. That’s enough if you need a basic backup copy.

Then you can always copy WhizFolder files back in case of a disaster. No special software is needed.

WhizFolders backup feature is an extension of the simple copy operation

In WhizFolders, a Backup is simply a copy of the file with a different name. To reuse such a copy in case of a file corruption, you just need to copy it back to your original location and rename it to remove backup and date prefixes. That’s it. There is no need to do some kind of import or restore operation from the backup folder in order to use the copy. In fact, you can go to the backup folder and directly open a file to look at it. But that file won’t be added to the List of Files since it’s from the backup folder.

Setting up the backup folder: You can set it up on the Main Window menu “Tools–Backup Options.” WhizFolders will ask you to set it up anyway when you go to do your first backup.

Backup options

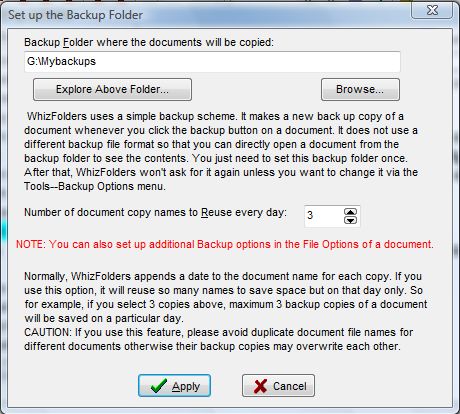
In the above picture of Backup Options, the folder “G:\Mybackups” is set as the back up folder.

There is a second option “Number of document copy names to reuse every day.” I will explain it in a minute. For now I select the value 3 for it.

First you need to understand how the backup takes place. OK. So I select the above backup folder and click on Apply. Now WhizFolders remembers G:\Mybackups as the backup folder.

Backing up a file: Once I set up the Backup folder, all I need to do is, use the Save and Backup operation on the File–Save Other menu. As soon as I do that, WhizFolders saves and copies that file to the backup folder. Actually WhizFolders copies it by the same file name but appends the date and a number to that name.

For example, here is a message WhizFolders shows after performing the backup: “File copied successfully to G:\Mybackups\Backup My notes 20 Dec 07, 2.wzfolder” Notice how it made up that name. The name starts with “Backup” followed by the document name “My notes” and then the date “20 Dec 07” and finally 2 to show that it is the second backup copy of that document on that date.

Now you will understand the meaning of that second option “Number of document copy names to reuse every day” in the above picture. If I make its value 0 then on each backup a fresh copy will be created. Since I selected 3 for the value, it will create copies by the following names:

  1. Backup My notes 20 Dec 07, 1.wzfolder
  2. Backup My notes 20 Dec 07, 2.wzfolder
  3. Backup My notes 20 Dec 07, 3.wzfolder

If I do another backup operation on that day, the oldest file copy “Backup My notes 20 Dec 07, 1.wzfolder” will be overwritten because WhizFolders will reuse that copy name. So I will always have last 3 backed up copies of a file on that day.

If you want automatic backup operation whenever a file is closed, you can set that up on the Settings–List File–Backup page.

There is another option there that also allows you to save an RTF copy of the file at the same time. Use it only for small documents as it will make the operation slow.

What if I want to see the contents of the backup folder to explore some old copies? You can do that by going to that folder in Windows File Manager. For example, in this case, I can open G:\Mybackups in Windows File Manager to see its contents. For this purpose, WhizFolders also gives a quick “Open Backup Folder in Explorer” menu on the Tools menu of List of Files tab.

Important Note: Note that I can directly open a backup copy of the file in WhizFolders but it won’t appear in the List of Files because WhizFolders treats the backup folder as not a “regular use” folder.

Don’t do this: For the reason given above, please do not set up one of your regular document folders as a Backup folder. It makes no sense. If you do this then any files opened from that folder will not appear in the List of Files.

Use organizing features in WhizFolders creatively

There are some key advantages of using WhizFolders for organizing your notes and ideas:

  1. You can arrange the note titles in a hierarchy, often with a simple drag and drop.
  2. A note in WhizFolders is in free rich text format, there is no rigid data entry screen that limits you.
  3. You can insert links going from one note to another and use these links for better reviewing of your notes.
  4. You can have links opening external files or web sites in their respective applications.
  5. These links can also be directly inserted in the hierarchical list of notes, giving you a powerful bookmarking app.
  6. You can print a bunch of notes together with an automatic table of contents.

The free format, drag and drop outlining and linking features should get your creative juices flowing. See the presentation on home page of whizfolders.com to get ideas on the applications that can be made with WhizFolders.

Import utility updated to version 3.2

Over the years, I have received requests from the users asking for solutions to import notes and outlines into WhizFolders from their files in various formats. Sometimes these files were created by exporting notes from other organizers and outliners. Hence, I had developed an Import utility to do that. Note that this utility is meant for advanced users only who understand what export and import means in terms of organizers and outliner programs.

This import utility has now been updated to version 3.2. Here is a brief list of what’s new in Import Utility 3.2 for WhizFolders:

  • It can import sticky notes from Windows 7 or later. You need to stop the Windows Sticky Notes program in order to do that.
  • It has an in-built Getting Started guide. Note that most of the import operations are for advanced users and can only be used after reading the somewhat geeky guide.
  • It has a Software Updates checking menu to know whether there is an update available.

Where to download from: See the bottom of the downloads page on whizfolders.com.

Note that since this import utility is meant to be used by advanced users, it has no installer. You need to unzip it into a folder and run it from there. Please click on “Getting Started” button to read the documentation to see what all import formats it supports. If you need any other, please let me know. This utility’s interface has been revamped in this version. If you find any bugs, please let me know.

If you have received some other custom import utility from me in the past that this program does not support, please send me some details so that I can move that import logic into this import utility.

Make an application and document launcher with WhizFolders

In a previous article, I showed you how you can make your own bookmark or favorites application where you can attach detailed notes to the bookmarks to help you remember why you created them.

Here I will show you how you can make an Application or Document launcher utility with WhizFolders with the added advantage that you can keep detailed notes on these applications or documents. Moreover, it is easier to arrange your launching links in a hierarchy with WhizFolders by simple drag and drop.

Links in the topic text

If you have already used Links in the text of your topics, you are half way there.  There are many types of links possible in WhizFolders. You can read all about them in the tutorial file given with WhizFolders or in the user guide. A topic link when clicked goes to another topic. A file or folder link opens any kind of document or folder on your system. If the file happens to be an application, it is launched.

Links in the topic list

To make a launcher utility, I suggest that instead of inserting links in the text of a topic, you directly insert them in the Topic List.  The main advantage of keeping your links in the topic list is that it gives you the power of outlining them in a hierarchy. You can still write notes in them as described below.

The easiest way to insert launcher links is to Alt-drag them from Windows Explorer

Make a WhizFolder file that you want to serve as your application or document launcher. Open a Windows Explorer window on the side and inside it, locate and select the file, application or the folder that you want to launch. Then press the Alt key and drag the selected file to the topic list. This will insert a launcher link. Double-click the topic name in the list to test that the target file opens.

A few tips:

  • You can even drop multiple files this way to insert multiple links in the topic list.
  • Each link gets the icon of the target file.
  • If you drag and drop a text file without pressing the Alt key, you don’t get a link but the whole file contents are inserted as a topic.
  • After making these link topics, you can rearrange them like any other topics by Move buttons on the toolbar or by drag and drop.

How do you attach notes to these links?

  • Each such topic in the list contains its target link at the top of its topic text. You can write your own notes below that line. Don’t disturb that first line.
  • If you don’t want to disturb the link topic’s contents, you can add a child topic that contains notes on that link. You can color your notes and link topics differently so that you can identify them easily.

You can have different WhizFolder files keeping different set of links. All the above features allow you to make very powerful launcher documents where your detailed notes will help you find and remember your documents and files in a better way.

More advanced users can even take help of OLE

WhizFolders also allows you to insert ole objects in the text of your topics. For example, you can keep a spreadsheet directly in the text of a topic. For more details, please see the OLE OBJECTS category on the right.

SpellUtils, Custom Dictionary Utility

This is an old article. I have not revived this utility in the new support area. I guess, this is an advanced tool and hardly anyone ever used it. I will revive it only if someone asks for it.

SpellUtils utility is meant for advanced users of WhizFolders Spelling Checker. It is part of WhizFolders Addons that is available in the paid user support area. When you install WhizFolders Addons, you will see this utility on the Windows Start Menu group, WhizFolders Addons.

SpellUtils allows you to import word lists from text files to your custom dictionaries (adu files). The custom dictionaries are used in WhizFolders Spelling Checker to ignore or auto correct your own words which would normally cause a spelling error.

If you don’t know what a custom dictionary is, please read the article “All about custom dictionary files for the Spelling Checker.”

If you know what a custom dictionary is, how it is used in WhizFolders and how you can edit it to change the Ignore, Auto Correct and Exclude lists, you will appreciate this utility better. When you use the Edit button to directly edit these lists, you can only add one word or word pair at a time in the above lists. But suppose, you are already using another spelling checker with some other word processor. You have already added hundreds of words and auto correct word pairs in that tool, how can you transfer those lists to the custom dictionaries in WhizFolders spelling checker? That’s where this utility is useful.

SpellUtils has easy buttons to import the Ignore, Auto Correct and Exclude lists from plain text files. The only requirement is that for Ignore and Exclude lists, each word should be on one line. In case of Auto Correct lists, the word and its replacement should be separated by a tab character on the same line. Note that this utility and WhizFolders spelling checker can only use non-unicode text files. So if you have unicode text files, you may need to edit them to remove words that can’t be saved in a normal text file and then save that file as normal text file before using it in this utility.

When you start SpellUtils, it is automatically able to find the path where WhizFolders custom dictionaries are installed whether it is Windows XP or Vista. Then you can browse and select an existing dictionary (.adu) to work with or you can create a new adu file. Once you do that, SpellUtils allows you to import the above lists in the selected custom dictionary ADU file.

Similarly, to transfer your word lists from WhizFolders Spelling Checker to other spelling checkers, you can use the Export buttons of the utility.

What is the easiest way to return the backup files to WhizFolders? I had to restore my system and want to use the backup files.

The main thing to remember is that a backup file is nothing but a simple copy of a WhizFolder file with the name changed to show that it’s a backup copy made on a certain date. Also, multiple copies of the same file are usually present in the backup folder. So all you need to do in order to reuse a backup file is to copy the file back to your documents folder and then rename it back to the original file name by editing the name to remove the date description.

Here are the detailed steps:

  1. Open the backup folder in Windows Explorer.
  2. You will see the backup WhizFolder files with names starting with “Backup” and ending with a date. By looking at the date in the name, you can easily find the latest backup copy of a file.

    If this seems difficult, use the following steps to sort the file list in Windows File Manager on modified date.

    (a) Change the File Manager settings to show the “detailed” list by View menu. You may have to right-click on the column names and add “modified” column to the list so that you can sort by date.

    (b) Once you are viewing in the View–Details mode, click on the Modified column once or twice to sort the list such that the most recent date appears at the top.

  3. By now, you should have selected a proper backup file–the one you want to reuse.
  4. Right-click, copy the file and paste it in your regular documents folder.
  5. Rename the copied file to remove “Backup” from the beginning of the name and the date from the end.
  6. Double-click on the file name so that it opens in WhizFolders. Or, use the File–Open menu in WhizFolders to open it.
  7. As soon as you open it, it appears in the List of Files in WhizFolders.
  8. Repeat the above steps for each back up file that you want to restore.