Get a 2022 Calendar Diary for use with WhizFolders

If you are already using an older Calendar Diary file with WhizFolders, you can straightaway download the new year 2022 Calendar Diary file from the link given at the end.

The hyperlinking features of WhizFolders can be put to good use in a Calendar Diary (or events) file where in addition to quickly going to a date’s page, you can go forward, backward by days, weeks, months. You can download such a Calendar Diary file for the current year by a download link at the end of this article.

Many uses of this file: You can use this WhizFolder file as a calendar diary, journal, events, tasks or for any free format note taking related to dates. Further, you can use it with any WhizFolders edition (even the trial). You can feel the power of WhizFolders hyperlinks and free format concept when you start using it. Please look at the tips in the “How to use” topic at the top of the file.

Here is an example of how a Calendar Diary file works:

Download: You can download the latest year file from the Downloads page of WhizFolders.com

Important note on downloading: Sometimes, the browser downloads and marks the file read only in the file system. In that case, WhizFolders opens it read-only and you can not modify the file. If you see a read-only label in WhizFolders after opening this file, please use Windows Explorer to see the right-click properties of this file and switch off the “read only” flag. Then open the file in WhizFolders again.

The idea for events file originally came from Steve Jarjoura who contributed the event files for earlier years. I am now generating the event file from a small utility that I made up. I have used some new features like icons and Popup links in the new file.

Using WhizFolders as Adwords Planner

The initial research for any new adwords campaign can be quite complex. When it comes to Adword Tools, Google has Keyword Planner and Adwords Editor. They are OK but have no features for keeping notes on various activities. Adwords Editor does have a Comment panel now but that does not really help. I use WhizFolders to manage the complexity of keeping notes on Adwords. Please Read the article here.

Use organizing features in WhizFolders creatively

There are some key advantages of using WhizFolders for organizing your notes and ideas:

  1. You can arrange the note titles in a hierarchy, often with a simple drag and drop.
  2. A note in WhizFolders is in free rich text format, there is no rigid data entry screen that limits you.
  3. You can insert links going from one note to another and use these links for better reviewing of your notes.
  4. You can have links opening external files or web sites in their respective applications.
  5. These links can also be directly inserted in the hierarchical list of notes, giving you a powerful bookmarking app.
  6. You can print a bunch of notes together with an automatic table of contents.

The free format, drag and drop outlining and linking features should get your creative juices flowing. See the presentation on home page of whizfolders.com to get ideas on the applications that can be made with WhizFolders.

Make an application and document launcher with WhizFolders

In a previous article, I showed you how you can make your own bookmark or favorites application where you can attach detailed notes to the bookmarks to help you remember why you created them.

Here I will show you how you can make an Application or Document launcher utility with WhizFolders with the added advantage that you can keep detailed notes on these applications or documents. Moreover, it is easier to arrange your launching links in a hierarchy with WhizFolders by simple drag and drop.

Links in the topic text

If you have already used Links in the text of your topics, you are half way there.  There are many types of links possible in WhizFolders. You can read all about them in the tutorial file given with WhizFolders or in the user guide. A topic link when clicked goes to another topic. A file or folder link opens any kind of document or folder on your system. If the file happens to be an application, it is launched.

Links in the topic list

To make a launcher utility, I suggest that instead of inserting links in the text of a topic, you directly insert them in the Topic List.  The main advantage of keeping your links in the topic list is that it gives you the power of outlining them in a hierarchy. You can still write notes in them as described below.

The easiest way to insert launcher links is to Alt-drag them from Windows Explorer

Make a WhizFolder file that you want to serve as your application or document launcher. Open a Windows Explorer window on the side and inside it, locate and select the file, application or the folder that you want to launch. Then press the Alt key and drag the selected file to the topic list. This will insert a launcher link. Double-click the topic name in the list to test that the target file opens.

A few tips:

  • You can even drop multiple files this way to insert multiple links in the topic list.
  • Each link gets the icon of the target file.
  • If you drag and drop a text file without pressing the Alt key, you don’t get a link but the whole file contents are inserted as a topic.
  • After making these link topics, you can rearrange them like any other topics by Move buttons on the toolbar or by drag and drop.

How do you attach notes to these links?

  • Each such topic in the list contains its target link at the top of its topic text. You can write your own notes below that line. Don’t disturb that first line.
  • If you don’t want to disturb the link topic’s contents, you can add a child topic that contains notes on that link. You can color your notes and link topics differently so that you can identify them easily.

You can have different WhizFolder files keeping different set of links. All the above features allow you to make very powerful launcher documents where your detailed notes will help you find and remember your documents and files in a better way.

More advanced users can even take help of OLE

WhizFolders also allows you to insert ole objects in the text of your topics. For example, you can keep a spreadsheet directly in the text of a topic. For more details, please see the OLE OBJECTS category on the right.

Make your own Bookmarks or Favorites utility where you can attach detailed notes on the bookmarks

Do you know that you can actually drag and drop a web site address from your browser’s address bar to a topic list in WhizFolders? This inserts a link type topic that works like a bookmark. Whenever you double-click on that topic in the topic list, it opens that web site in your browser.

The nice thing about using a WhizFolder file to keep bookmarks is that you can keep detailed notes on your bookmarks. You can write notes on that web site or bookmark in the topic that is created for that link. Just don’t disturb the first line and put your notes in the rest of the topic. This way, you can set up a WhizFolder document as a bookmark collection for often used web sites. What is more, you get all the features of topic list outlining for this bookmark list, and you can have more than one such documents, each keeping a different set of bookmarks. This makes WhizFolders a convenient bookmark utility.

Also, in case you don’t know, you can import your current Favorites from Internet Explorer in the topic list by using the menu “Insert–A Favorites folder or Insert–Links in Topic List–Multiple Favorites.” This import also inserts link type topics similar to the one described above. The only difference is that these topics point to the Favorite shortcut files (URL files) instead of to the actual web site.

Known problem with Internet Explorer 7 on Windows Vista: The drag and drop from the address bar in Internet Explorer 7 does not work in Windows Vista unless you are running Internet Explorer as administrator. This problem doesn’t occur with FireFox.

Also see: Make an application and document launcher with WhizFolders

Creating reminder notes with the help of Windows Task Scheduler

We just discovered a way to set up a reminder so that WhizFolders will automatically start at a preset time, positioned on a particular note. I want to share that tip with you.

Let’s assume that you want a particular WhizFolders note to be opened automatically at 11 AM every day.

Step 1: We first need to get a Run command that starts WhizFolders on that note. We can do that in WhizFolders 6.1.2 in a roundabout way, by creating a desktop shortcut–not very straightforward, I admit, but it works. In the next version to be released, we have already made it better. But for now, let’s see how to get the Run command in WhizFolders 6.1.2.

  1. Open your WhizFolder document, select the topic, and click on the menu “Tools- Create Shortcut for the Selected Topic on Windows Desktop.”
  2. Once the shortcut is created, find it on your Desktop and right-click on the shortcut to see the “properties.” From the “Properties,” select and copy the full content of the “Target” box. This is the Run command that we want. Keep this copied in the clipboard as we are going to use it in the Task Scheduler.

Step 2, Make the reminder in the Windows Task Scheduler (Windows XP):

  1. Click on “Settings–Control Panel –Scheduled Tasks–Add Scheduled Task.” A “Scheduled Task Wizard” comes up. Click on “Next.”
  2. Click on “Browse” on the wizard window. Select the document from “Select a Program to Schedule” Dialog box.
  3. After that the series of dialogs is quite easy to understand where we set up a Daily reminder time of 11 AM. I’m not going into details here as it’s easy to understand, and you can consult the help for the Task Scheduler. The last screen has a check box “Open advanced properties.” Select that so that the following properties dialog opens up after the task is set up. You can even get to it later by right-click on the task.
  4. In the “Run” Text box paste the Run command that you copied from step 1. Click on “Apply.” You are done. The note will now be opened at that time.

Step 2, Make the reminder in the Windows Task Scheduler (Windows Vista):

  1. On Vista, you will find Task Scheduler in Administrative Tools in Control Panel–System maintenance. But there is an easier way to quickly start it. Just click on Start menu and type “Task” in the Start Search at the bottom. This will quickly show the Task Scheduler icon by which you can start it.
  2. Here, you need to click on the menu Action–Create a Basic Task. After that, the setting up of reminder time is easy to understand. Finally, select “Starting a Program.” You see a “Start a Program” screen with two boxes “Program” and “Add Arguments” as shown below.
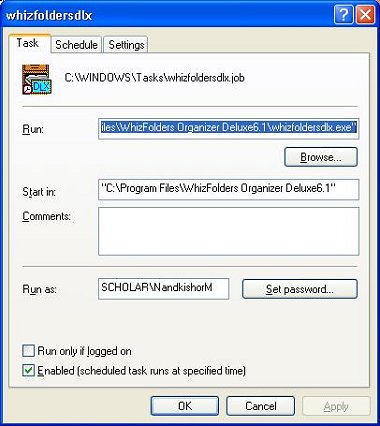
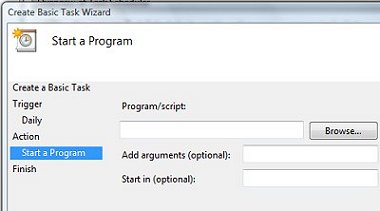
You need to split the Run Command that we copied above in two parts. Enter the first double-quoted value that gives the full path name of WhizFolders exe file in the Program box. Put the rest of the Run command in the “Add arguments” box and complete the wizard by clicking on the Next button till it finishes. That’s it. You’re all set.

Finally, you can delete the desktop shortcut created in Step 1 unless you want to keep it.

Is it possible to publish a WhizFolder document on the Internet so that the text and links can be seen in the browser?

A direct web publishing is not possible. But you can combine multiple topics to create a single web page (html file) with working links between topics and to the other web sites. Then you can transfer this web page to a web site manually by using a publishing or ftp program. Exporting to multiple pages is not possible yet.

To see the details on how to export to HTML, please look up Help Index of WhizFolders on “Exporting to HTML.” Note that there are certain limitations of this export as mentioned later.

Steps to Export the Topics to a web page or HTML File:

  1. Select one or more Topics from the Whizfolder document
  2. Click on the menu “Tools–Export selected topics–To HTML File.”
  3. A screen comes up asking for the Title of the web page.
  4. Type a name for the web page and select “Also put jumped topics in the HTML file” check box.
  5. Click on OK. A dialog comes up to save to an HTML file.
  6. Select a file name and the web page is exported and WhizFolders also gives an option to bring up the browser to test the web page.
  7. When you have tested the page, you can use a file transfer (FTP) program to copy it to your web site.

Limitations:

  1. Pictures can not be exported to the HTML File. But you can insert html tags to do that. This is explained in the help file and in the article “Inserting custom HTML tags.”
  2. Formatting of the text might change as all the RTF options are not possible in HTML.
  3. If the check box “Also put jumped topics in the HTML file” is not selected, the links to unexported topics won’t work (i.e. they won’t show the target topic when clicked)
  4. To get a hierarchial list of topic name links at the top of the web page, select that option and make sure that you have selected a complete hierarchy of topics in the topic list.

Is there any way to include date and time in the topic name when I create a new topic?

When editing a topic name you can always press F4 or F5 to insert date or date/time (the same keys as in topic editor).

It is also possible to automatically include date and time in a new topic name for a document by setting that up in the Settings–List File. Here is a concrete example:

  • You must have noticed that by default, when you create a new topic, the topic name generated is “New Topic.”
  • Now click on the menu “Settings–List File.”
  • Click on the “New Names” Tab and look at the pull-down list “Start a New topic name with” that gives you various options.
  • Choose the option “Date” to automatically prefix new topic names with date.
  • Click OK.
  • Now add a new topic to this document. You will notice that the date is automatically prefixed and the selection allows you to type a name beyond it. How convenient!

This feature allows you to set up a document as a journal or a time log. You can also look at other options available on the above pull down. For instance, you can also have custom characters put before or after the topic name.

I am a web research professional, and keep the copies of certain pages offline for reference purposes in my work. Is there a way to attach an .mht file to a topic, or to attach a normal html file? I want to open the attachments quickly when reviewing those notes.

This can be done by the feature called “Link to external file or document.” Here is an example of how to do it:

  1. Suppose your WhizFolder document is at the location “d:\my stuff\mydoc.wzfolder”
  2. Save your .mht file in the same folder (or make a subfolder within it to keep such files).
  3. In your WhizFolder document, start editor on the topic in which you want to put the file link.
  4. Leave the editor on and open the folder “d:\my stuff” in Windows Explorer. Keep both windows side by side.
  5. Select the .mht file in Explorer, and drag and drop on to the editor to drop a link.
  6. This will insert a link that can be used to open the attachment anytime. Moreover, the link will work even when you move the document along with such .mht files or the subfolders containing them. This way, you can keep links to attachments and your notes around them too.
  7. Put your detailed notes on this link in the same note or make a list of notes after that note. It is upto you. For example, when I start to study a new book, I keep a link to its PDF file this way and can open it quickly anytime to continue making notes while studying it.

Other ways to do the same thing:

  • Instead of steps 4 and 5 above, you can even use the Insert menu to insert links to files and folders, even the attachment folder itself can be opened with a link.
  • You can insert links in the same manner (both methods) in the topic list itself. The advantage is that you can just double-click on that note name in the topic list to open the attachment. You can even use list outlines to organize such links. In this case the first line of the topic that is created is automatically reserved for the document path and your notes can follow in the rest of the topic.